
Love Letter Garland
Make this super cute Valentine's Day garland with just a few pieces of felt, ribbon, some hot glue, and about half an hour of your time!
Pin
Facebook
Email
Makes: 1 five-foot garland
Materials
- Printable template
- 1 piece white felt (9" x 12")
- 1 piece red felt (9" x 12")
- 1 piece pink felt (9" x 12")
- 60" ribbon or string of choice
Instructions
- Get your free template for this garland by filling out the form in this post. Print the template on an 8.5" by 11" sheet of paper and cut out the envelope and all three hearts.
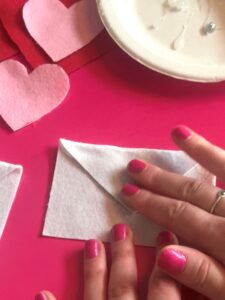
- Trace 4 envelopes on a piece of white felt using a pencil or marker. Cut them out using craft or fabric scissors.
- Trace 4 small hearts on pink or red felt (I prefer red), then cut them out. These will be glued onto the envelopes/love letters.
- Trace 3 large hearts on red felt and 3 medium hearts on pink felt before cutting them out. I made the larger hearts red and the medium hearts pink, but you can reverse the colors if you'd like!You should now have all of the felt pieces you need for this garland cut out.

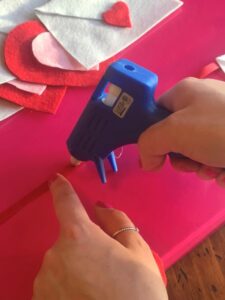
- Get your glue gun plugged in and warmed up! Then carefully add hot glue to the top flap portion of the envelope cutout, focusing on the edges.

- Fold this top flap over and press it down to ensure it sticks to the bottom part of the envelope.
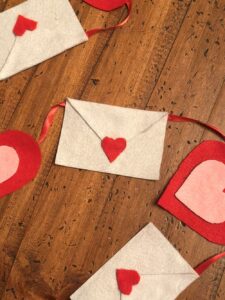
- Add a small dot of hot glue where the flap meets the other part of the envelope and press on one of the small red hearts. Repeat these steps for the other 3 love letters.

- Next, assemble the pink and red hearts by gluing the medium hearts onto the center of the larger ones, pressing firmly to ensure they stick.

- Once all pieces have cooled, measure and lay out your garland to ensure even spacing. Using a 60" string, leave two 7-8" tails at each end and 2-3" gaps between each of the pieces of the garland. Alternate between love letters and hearts, starting and ending the garland with a love letter. I use a permanent marker to mark the spots where I'll be adding glue for each piece of the garland as the pieces will likely slip and move a bit as you begin gluing the garland. You can also skip this entire step and just eyeball the spacing—up to you!
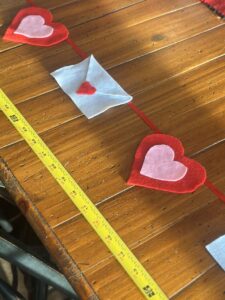
- Glue the love letters and hearts onto the string or ribbon, pressing down firmly to ensure they stick well.
- Allow the glue to fully cool (which shouldn't take long), then hang the garland up for Valentine's Day!
Share This Post:
Did you try this craft/DIY project?Click here to leave a rating and review!
